作者: 钟华,腾讯云容器团队高级工程师,热衷于容器、微服务、service mesh、istio、devops 等领域技术
今天我们分析下istio-sidecar-injector 组件:
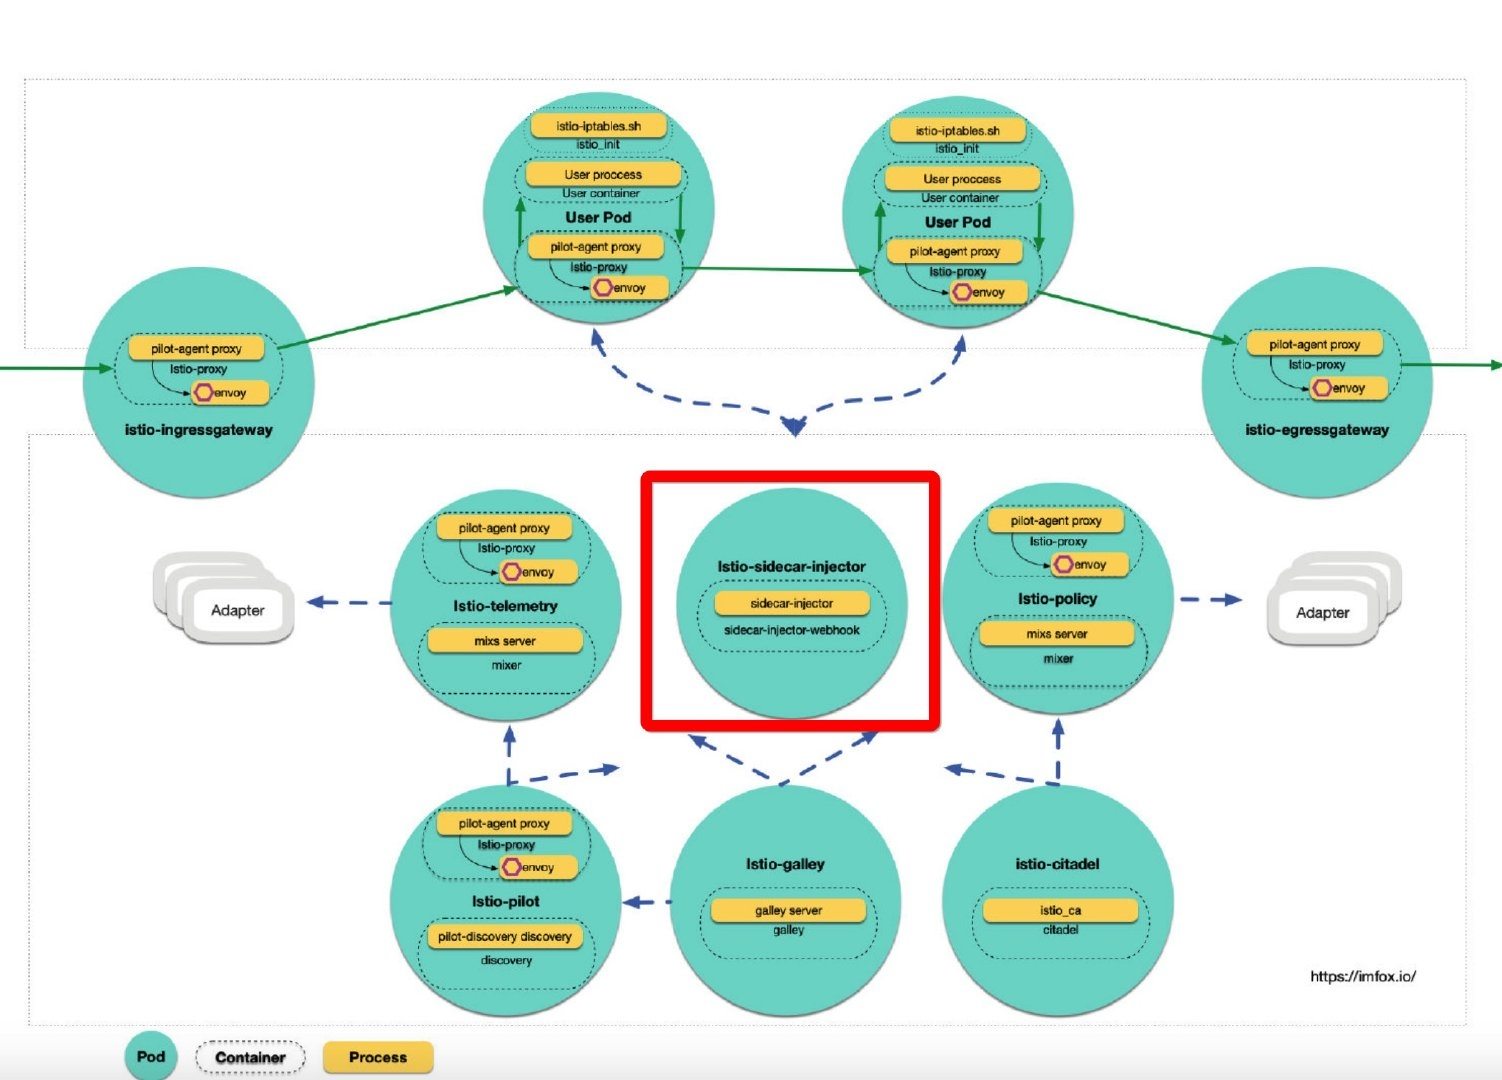
用户空间的Pod要想加入mesh, 首先需要注入sidecar 容器, istio 提供了2种方式实现注入:
- 自动注入: 利用 Kubernetes Dynamic Admission Webhooks 对 新建的pod 进行注入: initContainer + sidecar
- 手动注入: 使用命令
istioctl kube-inject
「注入」本质上就是修改Pod的资源定义, 添加相应的sidecar容器定义, 内容包括2个新容器:
- 名为
istio-init的initContainer: 通过配置iptables来劫持Pod中的流量 - 名为
istio-proxy的sidecar容器: 两个进程pilot-agent和envoy, pilot-agent 进行初始化并启动envoy

1. Dynamic Admission Control
kubernetes 的准入控制(Admission Control)有2种:
- Built in Admission Control: 这些Admission模块可以选择性地编译进api server, 因此需要修改和重启kube-apiserver
- Dynamic Admission Control: 可以部署在kube-apiserver之外, 同时无需修改或重启kube-apiserver.
其中, Dynamic Admission Control 包含2种形式:
- Admission Webhooks: 该controller 提供http server, 被动接受kube-apiserver分发的准入请求.
- Initializers: 该controller主动list and watch 关注的资源对象, 对watch到的未初始化对象进行相应的改造.
其中, Admission Webhooks 又包含2种准入控制:
- ValidatingAdmissionWebhook
- MutatingAdmissionWebhook
istio 使用了MutatingAdmissionWebhook来实现对用户Pod的注入, 首先需要保证以下条件满足:
- 确保 kube-apiserver 启动参数 开启了 MutatingAdmissionWebhook
- 给namespace 增加 label:
kubectl label namespace default istio-injection=enabled - 同时还要保证 kube-apiserver 的 aggregator layer 开启:
--enable-aggregator-routing=true且证书和api server连通性正确设置.
另外还需要一个配置对象, 来告诉kube-apiserver istio关心的资源对象类型, 以及webhook的服务地址. 如果使用helm安装istio, 配置对象已经添加好了, 查阅MutatingWebhookConfiguration:
% kubectl get mutatingWebhookConfiguration -oyaml
- apiVersion: admissionregistration.k8s.io/v1beta1
  kind: MutatingWebhookConfiguration
  metadata:
    name: istio-sidecar-injector
  webhooks:
    - clientConfig:
      service:
        name: istio-sidecar-injector
        namespace: istio-system
        path: /inject
    name: sidecar-injector.istio.io
    namespaceSelector:
      matchLabels:
        istio-injection: enabled
    rules:
    - apiGroups:
      - ""
      apiVersions:
      - v1
      operations:
      - CREATE
      resources:
      - pods
该配置告诉kube-apiserver: 命名空间istio-system 中的服务 istio-sidecar-injector(默认443端口), 通过路由/inject, 处理v1/pods的CREATE, 同时pod需要满足命名空间istio-injection: enabled, 当有符合条件的pod被创建时, kube-apiserver就会对该服务发起调用, 服务返回的内容正是添加了sidecar注入的pod定义.
2. Sidecar 注入内容分析
查看Pod istio-sidecar-injector的yaml定义:
%kubectl -n istio-system get pod istio-sidecar-injector-5f7894f54f-w7f9v -oyaml
......
    volumeMounts:
    - mountPath: /etc/istio/inject
      name: inject-config
      readOnly: true

  volumes:
  - configMap:
      items:
      - key: config
        path: config
      name: istio-sidecar-injector
    name: inject-config
可以看到该Pod利用projected volume将istio-sidecar-injector这个config map 的config挂到了自己容器路径/etc/istio/inject/config, 该config map 内容正是注入用户空间pod所需的模板.
如果使用helm安装istio, 该 configMap 模板源码位于: https://github.com/istio/istio/blob/master/install/kubernetes/helm/istio/templates/sidecar-injector-configmap.yaml.
该config map 是在安装istio时添加的, kubernetes 会自动维护 projected volume的更新, 因此 容器 sidecar-injector只需要从本地文件直接读取所需配置.
高级用户可以按需修改这个模板内容.
kubectl -n istio-system get configmap istio-sidecar-injector -o=jsonpath='{.data.config}'
查看该configMap, data.config包含以下内容(简化):
policy: enabled // 是否开启自动注入
template: |-    // 使用go template 定义的pod patch
  initContainers:
  [[ if ne (annotation .ObjectMeta `sidecar.istio.io/interceptionMode` .ProxyConfig.InterceptionMode) "NONE" ]]
  - name: istio-init
    image: "docker.io/istio/proxy_init:1.1.0"
    ......
    securityContext:
      capabilities:
        add:
        - NET_ADMIN
    ......
  containers:
  - name: istio-proxy
    args:
    - proxy
    - sidecar
    ......
    image: [[ annotation .ObjectMeta `sidecar.istio.io/proxyImage`  "docker.io/istio/proxyv2:1.1.0"  ]]
    ......
    readinessProbe:
      httpGet:
        path: /healthz/ready
        port: [[ annotation .ObjectMeta `status.sidecar.istio.io/port`  0  ]]
    ......
    securityContext:
      capabilities:
        add:
        - NET_ADMIN
      runAsGroup: 1337
  ......
    volumeMounts:
    ......
    - mountPath: /etc/istio/proxy
      name: istio-envoy
    - mountPath: /etc/certs/
      name: istio-certs
      readOnly: true
      ......
  volumes:
  ......
  - emptyDir:
      medium: Memory
    name: istio-envoy
  - name: istio-certs
    secret:
      optional: true
      [[ if eq .Spec.ServiceAccountName "" -]]
      secretName: istio.default
      [[ else -]]
      secretName: [[ printf "istio.%s" .Spec.ServiceAccountName ]]
      ......
对istio-init生成的部分参数分析:
-u 1337排除用户ID为1337,即Envoy自身的流量- 解析用户容器
.Spec.Containers, 获得容器的端口列表, 传入-b参数(入站端口控制) - 指定要从重定向到 Envoy 中排除(可选)的入站端口列表, 默认写入
-d 15020, 此端口是sidecar的status server - 赋予该容器
NET_ADMIN能力, 允许容器istio-init进行网络管理操作
对istio-proxy 生成的部分参数分析:
- 启动参数
proxy sidecar xxx用以定义该节点的代理类型(NodeType) - 默认的status server 端口
--statusPort=15020 - 解析用户容器
.Spec.Containers, 获取用户容器的application Ports, 然后设置到sidecar的启动参数--applicationPorts中, 该参数会最终传递给envoy, 用以确定哪些端口流量属于该业务容器. - 设置
/healthz/ready作为该代理的readinessProbe - 同样赋予该容器
NET_ADMIN能力
另外istio-sidecar-injector还给容器istio-proxy挂了2个volumes:
-
名为
istio-envoy的emptydir volume, 挂载到容器目录/etc/istio/proxy, 作为envoy的配置文件目录 -
名为
istio-certs的secret volume, 默认secret名为istio.default, 挂载到容器目录/etc/certs/, 存放相关的证书, 包括服务端证书, 和可能的mtls客户端证书% kubectl exec productpage-v1-6597cb5df9-xlndw -c istio-proxy -- ls /etc/certs/ cert-chain.pem key.pem root-cert.pem
后续文章探究sidecar istio-proxy会对其进一步分析.
3. istio-sidecar-injector-webhook 源码分析
- 镜像Dockerfile:
istio/pilot/docker/Dockerfile.sidecar_injector - 启动命令:
/sidecar-injector - 命令源码:
istio/pilot/cmd/sidecar-injector
容器中命令/sidecar-injector启动参数如下:
  - args:
    - --caCertFile=/etc/istio/certs/root-cert.pem
    - --tlsCertFile=/etc/istio/certs/cert-chain.pem
    - --tlsKeyFile=/etc/istio/certs/key.pem
    - --injectConfig=/etc/istio/inject/config
    - --meshConfig=/etc/istio/config/mesh
    - --healthCheckInterval=2s
    - --healthCheckFile=/health
sidecar-injector 的核心数据模型是 Webhookstruct, 注入配置sidecarConfig包括注入模板以及注入开关和规则:
type Webhook struct {
	mu                     sync.RWMutex
	sidecarConfig          *Config // 注入配置: 模板,开关,规则
	sidecarTemplateVersion string
	meshConfig             *meshconfig.MeshConfig

	healthCheckInterval time.Duration
	healthCheckFile     string

	server     *http.Server
	meshFile   string
	configFile string            // 注入内容路径, 从启动参数injectConfig中获取
	watcher    *fsnotify.Watcher // 基于文件系统的notifications
	certFile   string
	keyFile    string
	cert       *tls.Certificate
}

type Config struct {
	Policy InjectionPolicy `json:"policy"`
	Template string `json:"template"`
	NeverInjectSelector []metav1.LabelSelector `json:"neverInjectSelector"`
	AlwaysInjectSelector []metav1.LabelSelector `json:"alwaysInjectSelector"`
}
sidecar-injector 的root cmd 会创建一个Webhook, 该struct包含一个http server, 并将路由/inject注册到处理器函数serveInject
RunE: func(c *cobra.Command, _ []string) error {
    ......
    wh, err := inject.NewWebhook(parameters)
    ......
    go wh.Run(stop)
    ......
}

func NewWebhook(p WebhookParameters) (*Webhook, error) {
    ......
	watcher, err := fsnotify.NewWatcher()
	// watch the parent directory of the target files so we can catch
	// symlink updates of k8s ConfigMaps volumes.
	for _, file := range []string{p.ConfigFile, p.MeshFile, p.CertFile, p.KeyFile} {
		watchDir, _ := filepath.Split(file)
		if err := watcher.Watch(watchDir); err != nil {
			return nil, fmt.Errorf("could not watch %v: %v", file, err)
		}
	}
	......
	h := http.NewServeMux()
	h.HandleFunc("/inject", wh.serveInject)
	wh.server.Handler = h
	......
}
Webhook#Run方法会启动该http server, 并负责响应配置文件的更新:
func (wh *Webhook) Run(stop <-chan struct{}) {
	go func() {
		wh.server.ListenAndServeTLS("", "")
		......
	}()
	......
	var timerC <-chan time.Time
	for {
		select {
		case <-timerC:
			timerC = nil
			sidecarConfig, meshConfig, err := loadConfig(wh.configFile, wh.meshFile)
			......
		case event := <-wh.watcher.Event:
			// use a timer to debounce configuration updates
			if (event.IsModify() || event.IsCreate()) && timerC == nil {
				timerC = time.After(watchDebounceDelay)
			}
		case ......
		}
	}
}
Webhook#Run首先会启动处理注入请求的http server, 下面的for循环主要是处理2个配置文件的更新操作, select 里使用了一个timer(并不是ticker), 咋一看像是简单的定时更新配置文件, 其实不然. 配置文件更新事件由wh.watcher进行接收, 然后才会启动timer, 这里用到了第三方库https://github.com/howeyc/fsnotify, 这是一个基于文件系统的notification. 这里使用timer限制在一个周期(watchDebounceDelay)里面最多重新加载一次配置文件, 避免在配置文件频繁变化的情况下多次触发不必要的loadConfig
use a timer to debounce configuration updates
Webhook.serveInject 会调用Webhook#inject, 最终的模板处理函数是injectionData.
版权归作者所有, 欢迎转载, 转载请注明出处